3 Dec 2008

Paint that IDS

A friend of mine, Espen Grøndahl, has created his very own IDS. To be precise, it is not a IDS per se, but a tool to visualize firewall logs. It's written in Perl and visualizes OpenBSD's pf firewall log. The IDS is called Fireplot and can be downloaded here. It is really easy to identify port scans, like this plot shows.

Two friends of Espen decided they wanted to test Fireplot, so they crafted and launched a nice "attack":

"WTF are these pictures doing in my IDS log?!?"

The original Fireplot log can be seen here:

http://espen.mine.nu/cgi-bin/fireplot3/showimg.cgi?date=2005-10-28

They even got some Star Wars in there. Quite funny.

26 Oct 2008

Google video on your phone

I have a Nokia N73 "Music Edition" mobile phone. The "Music Edition" part isn't important to me, since I never listen to music when I'm on the run. I read. But sometimes I'm too tired to read, especially when I'm on my way home from work. But the subway takes 30 minutes so I'll have to do something.

Google releases a lot of technical video documentaries ("tech talks") that I hardly ever have time to watch. TED also have lots of interesting talks. My phone do support playing video - at least 3GP. The screen resolution is not that bad either, with 240x320 pixels. It also has a 2GB miniSD memory card, so storage shouldn't be a problem. You can download most of the Google videos (for "iPod/PSP") and TED talks. What you then get is a MPEG4 file. My phone does not play MPEG4, so how can I fix that?

There is some web-services that can convert video for you. Like zamzar.com, but in Zamazars case, it has a 100MB size-limit.

Luckily, ffmpeg can convert to and from anything.

1. Install:

  $ sudo aptitude install ffmpeg

2. Then, make sure the restricted codecs are installed. Follow the instruction from:

http://ubuntuguide.org/wiki/Ubuntu:Feisty#How_to_install_Multimedia_Codecs

3. Download your favorite Google/TED video.

4. Convert:

  $ ffmpeg -i downloaded-google-video.mp4 -s qcif -vcodec h263 -acodec aac \
  -ac 1 -ar 44100 -r 25 -ab 64 -y converted-google-video.3gp


5. Upload to your phone using bluetooth. Just one quick note: I had to configure my phone to use the miniSD for saving incoming messages. The internal storage is too small for the video file(s).

6. Play! Works great.

11 May 2008

Proper paper formatting with Latex and IEEEtran

Many scientific papers use Latex for formatting. There exists a Latex class called IEEEtran which "produce high quality typeset papers" (example here). Besides from being nice, it is also a requirement for many conferences/journals to submit papers using this class. But how do we install it on Ubuntu/Debian?

I re-installed one of my workstation with Ubuntu 8.04 here the other day. On it, I also need Latex with the IEEEtran class. To my surprise, installing it was easier than I though:

First we install the required Latex packages:

  # apt-get install texlive-latex-base texlive-latex-recommended texlive-fonts-recommended texlive-pictures texlive-science texlive-science texlive-latex-extra

Now, instead of manually installing the IEEEtran class, its already available in apt:

  # apt-get install texlive-publishers texlive-publishers-doc

Installed with documentation! Full read here:

  $ evince /usr/share/doc/texlive-publishers-doc/latex/IEEEtran/IEEEtran_HOWTO.pdf

and

  $ evince /usr/share/doc/texlive-publishers-doc/latex/IEEEtran/IEEEtran_bst_HOWTO.pdf

Now its just to install Emacs with my favorite Latex-mode:

  # apt-get install emacs23 auctex emacs23-el

Ready for writing!

5 Mar 2008

Triple boot OSX Leopard, Ubuntu 8.04 and Widows Vista

I received a Mac Mini today. We plan to use it as part of our lab setup here at work. The box is pretty small and compact. It's quite cheap too.

It will primarily be running some flavor of Linux, but I plan to install Windows Vista ("Business" version) and OSX Leopard on it as well. This way I can quickly test all three OSes if needed. So how do we set up triple boot on this box? It turns out to be quite easy.

1. Installing OSX Leopard


First, install OSX. Use the whole disk. After installation is complete, do a "software update" if needed.

2. Installing Windows Vista

Next, we need to split our OSX partition in two. One for OSX, which will be resized, and another for Windows. The program "Boot Camp" does all that for us. Start it from:

"Finder" → "Applications" → "Utilities" → "Boot Camp Assistant"

Boot Camp presents us with a nice slider to resize the OSX and Windows partition. I allocate 25GB to Windows Vista:

After the resize is complete, you'll be asked to insert the Vista DVD and choose "start installation". OSX reboots and boots from the Vista DVD. The last partition is for Vista, so we format it (using NTFS).

After a couple of reboots later, Vista is installed

At startup, Vista boots as default. To change this press and hold the "Alt" key startup boot. Boot into OSX.

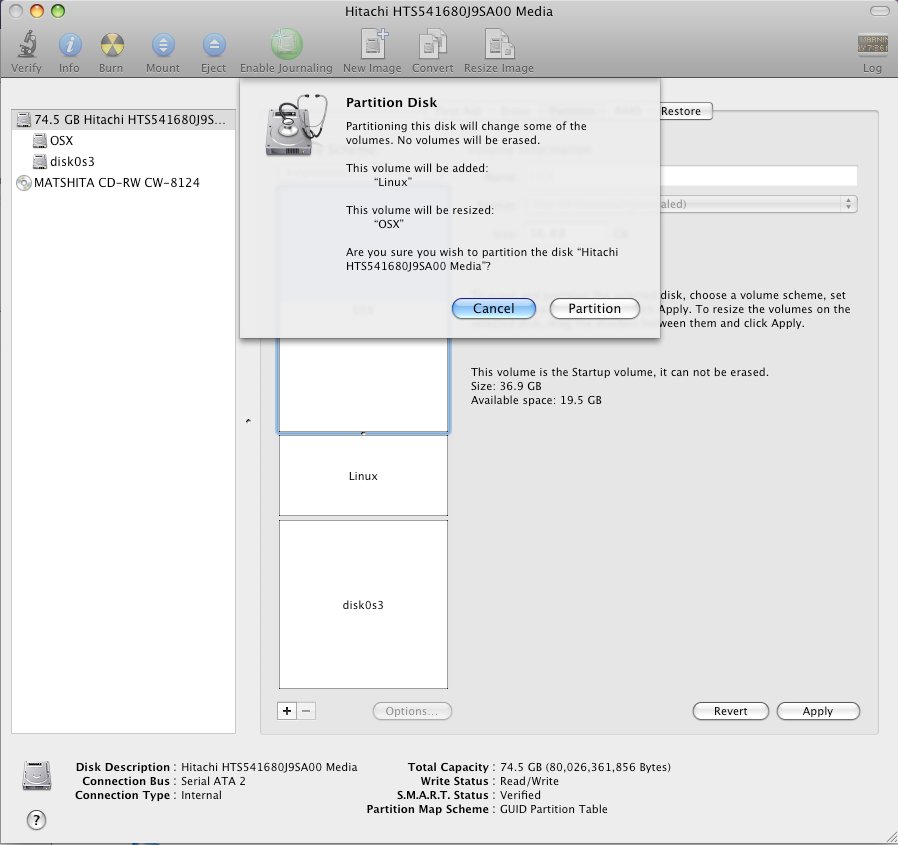
3. Re-partition and install rEFIt

In OSX, start "Disk utility" from "Utilities". Under "Partitions", choose the OSX partition and click the "+" button. This splits our OSX partition in two. The new partition will be our Linux partition. Don't worry about the name or format (HPFS), we'll re-create it using ext3 later.

Next, we need to download a boot-manager that manages both EFI (which Mac uses) and (old) MBR (required by Windows). Head over and download rEFIt. After you've installed rEFIt, open a "Terminal" and type (yes, still in OSX):

$ cd /efi/refit
$ ./enable.sh
+ sudo bless --folder /efi/refit --file /efi/refit/refit.efi --labelfile /efi/refit/refit.vollabel

Great! Now we have a nice graphical boot manager.

4. Installing Ubuntu 8.10

Download Ubuntu 8.04 (i386) from here and burn it to a CD. (Actually, since 8.04 isn't released yet, I'm using the alpha5-release fetched from here). Boot the installation CD from the rEFIt menu.

When installing Ubuntu, there are two important steps:
  1. When choosing partition be sure to manually partition the disk. Then delete the third (sda3) partition. Re-create it using ext3 and set the mount point to "/". Do NOT create a swap partition. We'll create swap later.
  2. Grub: Be sure to install grub on sda3 and NOT sda (hd0). You can change this by choosing "Advanced" under the last installation step.
At the next reboot, we're presented with a nice boot screen:

We're not quite done yet. Since Mac uses GPT, which don't allow logical partitions, and MBR, which Windows require, - we're stuck with four (primary) partitions. That's the reason why we can't have dedicated swap partition. So we create a swap file (in Ubuntu):

  $ sudo dd if=/dev/zero of=/swapfile bs=1024 count=2097152
  2097152+0 records in
  2097152+0 records out
  2147483648 bytes (2.1 GB) copied, 80.0314 s, 26.8 MB/s
  $ ls -lh /swapfile
  -rw-r--r-- 1 root root 2.0G 2008-03-05 18:34 /swapfile
  $ sudo chmod 600 /swapfile
  $ sudo mkswap /swapfile
  Setting up swapspace version 1, size = 2147479 kB
  no label, UUID=819c205d-b3de-4ed0-ae4c-17e8b7e81443
  $ sudo swapon /swapfile
  $ free -m
               total       used       free     shared    buffers     cached
  Mem:          1996        569       1426          0         12        196
  -/+ buffers/cache:        360       1635
  Swap:         2047          0       2047
  $ cat /etc/fstab
  ...
  /swapfile       swap    swap    defaults        0       0

That's it. Our partition layout now has the first (sda1) partition occupied by EFI, next (sda2) is OSX, third (sda3) Linux and the last (sda4) Vista. A graphical layout (using gparted) listed below:

16 Feb 2008

Balcony server

At my last place, I had a dedicated room full of servers. It was lovely mix of cra^Wold hardware running various flavors of Linux, BSD and Solaris. At my new place, we didn't have that much space so I was forced to do a cleanup. I bought a powerful server with sufficient RAM, CPU and disk. Now I have one server and a whole bunch of virtual machines running on it. (Throw in a couple of Linksys devices running openwrt and dd-wrt and I was happy.) There was one "problem" - the server had to be placed out on the balcony. It has been running out there for over a year now - how did that go?

When I started, I had two challenges: First, I had to build some kind of box to protect the machine from wind, rain and snow. Next, since we use the balcony a lot during summertime, the machine had to be fairly quiet.

Also, since the server is running at all time, I had to get some decent disks. I bought four "Western Digital Caviar RE2 500GB SATA2 16MB 7200RPM (WDC WD5000YS-01M)" which has a pretty high MTBF. They've been running in RAID 5 and have not failed me yet.

Since it is a sunny balcony and it can get pretty hot during the summer, the box had to have some kind of ventilation. But the ventilation could not allow snow drifting into to box during winter. After my carpenter work and a paint job, the box fit nicely into the corner of the balcony.


Neither drifting snow, wind or rain have been any problem. A bigger problem have actually been pollen grains during spring and summer. The box and chassis get full of it and have to be cleaned at least once during the summer.

I often get questions about humidity - isn't that a problem? The answer is no. I've had no problem with it at all. But keep in mind that the server is running at all time - if I turn it off, wait until it cools, and then turn it back on again, we can have condensation which can be catastrophic.

We all know that the operating temperature is really important for hard drives. So I do get a little worried when it's really hot during the summer. So I monitor the hard drives using Munin, and so far I've been within the temperature limits for the disks (5°C - 60°C).

During wintertime, the server is running happier (nice and cold) than ever:

15 Feb 2008

How to monitor Bind with Munin

Unix sysadmin and never heard of Munin? Good news for you: You have a great tool waiting. Munin monitors your servers, stores the results and generates pretty graphs for you to interpret. Munin itself is written in Perl, but uses plugins, written in language of choice, to fetch relevant data. The default install comes with a number plugins that works out-of-the-box - most of them written in Perl or shell. But some plugins, or services, require manual intervention to work. Bind is such a service, so let's see how we can monitor Bind with Munin.

I install Munin everywhere I can. It's a really helpful tool. After I've started using Munin (and Nagios), I'm puzzled of how I managed without before. Munin gives you historical graphs and enables you to predict resource consumption trends: "Is there any memory increase during the last year? Are the number of mail/spam increasing? What about CPU load? Network throughput?" etc.

Some time ago, I was at a customer and installed Munin on a bunch of servers. The next day, the sysadmin called and thanked me. He finally knew why he had to reboot two of his Oracle server every week. There was some kind of memory leak eating away all memory before the server crashed. He contacted Oracle to come up with a fix.

Another example: You arrive at work, and a server has crashed/rebooted/panicked during the night. Now, why did it do that? If you know why, perhaps you can prevent it from happening again. Munin can be of great help here: Check the graphs right before the crash - seeing anything unusual? Increase in network traffic? What about CPU load? Memory? Number of processes? It can give you a really good indication of what went wrong.

Munin do have some limitations. It does not scale well (to hundreds of servers) and I find it particularly painful to create aggregated graphs (for example aggregated network graph of two or more hosts). But I know these issues are being worked on.

Okay, enough talk - let's monitor Bind:

First we need enable logging. Create a log directory and add log directives to the Bind configuration file (here on Debian):

  # mkdir /var/log/bind9
  # chown bind:bind /var/log/bind9
  # cat /etc/bind/named.conf.options
  ...
  logging {
        channel b_log {
                file "/var/log/bind9/bind.log" versions 30 size 1m;
                print-time yes;
                print-category yes;
                print-severity yes;
                severity info;
        };

        channel b_debug {
                file "/var/log/bind9/debug.log" versions 2 size 1m;
                print-time yes;
                print-category yes;
                print-severity yes;
                severity dynamic;
        };

        channel b_query {
                file "/var/log/bind9/query.log" versions 2 size 1m;
                print-time yes;
                severity info;
        };

        category default { b_log; b_debug; };
        category config { b_log; b_debug; };
        category queries { b_query; };
  };

Restart bind:

  # /etc/init.d/bind9 restart
  Stopping domain name service: named.
  Starting domain name service: named.

You can now see log files are being populated under /var/log/bind9/*

Next, configure Munin:

Make sure the munin-user ("munin") can read you bind log files.

We need two additional plugins: "bind" and "bind_rndc". If you can't find them in your default install, head over here.

The "bind" plugin should work right away. "bind9_rndc" however need to read the "rndc.key file, which only are readable by the user "bind". You have two options, either run the plugin as root or add the user "munin" to the group "bind" and enable the group "bind" to read the rndc.file. For the sake of simplicity, I run the plugin as root here. So you need to add:

  # cat /etc/munin/plugin-conf.d/munin-node
  ...
  [bind9_rndc]
  user root
  env.querystats /var/log/bind9/named.stats
  ...

Next restart Munin:

  # /etc/init.d/munin-node restart
  Stopping munin-node: done.
  Starting munin-node: done.

Munin run every five minutes, so go take a coffee. Wait.

After a while, graphs arrive:

And the bind_rndc plugin:

(Consult the "BIND 9 Administrator Reference Manual" if you have trouble interpreting the results.)

Nice huh?

2 Feb 2008

Linux and Logitech QuickCam Pro 9000

I've been on the lookout for a decent webcam. After some searching, the choice fell on Logitech QuickCam Pro 9000, which should be supported according to the Linux UVC driver page. It's not one of the cheaper models, but not the most expensive either. It also has "HD-quality" (which in this case translates to resolution up to 1600x1200). So how does this camera works under Linux?

My first thought after unwrapping was "Is that it?". It was smaller than I had anticipated. But when it comes to webcam, smaller is better I guess.

Ubuntu 7.10 (i386) ships with UVC drivers, but they are too old. So we install new ones from trunk:

(Update! This webcam works out of the box on Ubuntu 8.04)

  $ svn checkout svn://svn.berlios.de/linux-uvc/linux-uvc/trunk
  $ cd trunk
  $ make
  $ sudo make install

When we now plug in the camera, it's detected properly:

  $ dmesg
  ...
  [14323.676000] usb 5-1: new high speed USB device using ehci_hcd and address 7
  [14323.932000] usb 5-1: configuration #1 chosen from 1 choice
  [14324.056000] Linux video capture interface: v2.00
  [14324.168000] usbcore: registered new interface driver snd-usb-audio
  [14324.180000] uvcvideo: Found UVC 1.00 device  (046d:0990)
  [14324.196000] usbcore: registered new interface driver uvcvideo
  [14324.200000] USB Video Class driver (v0.1.0)

  $ lsusb
  ...
  Bus 005 Device 007: ID 046d:0990 Logitech, Inc.

We see the modules are loaded:

  $ lsmod | grep uvc
  uvcvideo               48644  0
  compat_ioctl32          2304  1 uvcvideo
  videodev               29312  1 uvcvideo
  v4l1_compat            15364  2 uvcvideo,videodev
  v4l2_common            18432  2 uvcvideo,videodev
  usbcore               138632  10 snd_usb_audio,uvcvideo,snd_usb_lib,hci_usb,appleir,xpad,usbhid,ehci_hcd,uhci_hcd

The camera also has a built in microphone, which is detected and works (number #1 here):

  $ cat /proc/asound/cards
   0 [Intel          ]: HDA-Intel - HDA Intel
                        HDA Intel at 0x90440000 irq 21
   1 [U0x46d0x990    ]: USB-Audio - USB Device 0x46d:0x990
                        USB Device 0x46d:0x990 at usb-0000:00:1d.7-1, high speed

Time for testing!

A capable webcam viewer is luvcview. It has the ability to take snapshot (photos), record video (avi), change resolution etc. We download and install luvcview from here.

One nice feature is to list all supported resolutions:

  $ luvcview -L
  luvcview version 0.2.1
  Video driver: x11
  A window manager is available
  video /dev/video0
  /dev/video0 does not support read i/o
  { pixelformat = 'MJPG', description = 'MJPEG' }
  { discrete: width = 160, height = 120 }
          Time interval between frame: 1/30, 1/25, 1/20, 1/15, 1/10, 1/5,
  { discrete: width = 176, height = 144 }
          Time interval between frame: 1/30, 1/25, 1/20, 1/15, 1/10, 1/5,
  { discrete: width = 320, height = 240 }
          Time interval between frame: 1/30, 1/25, 1/20, 1/15, 1/10, 1/5,
  { discrete: width = 352, height = 288 }
          Time interval between frame: 1/30, 1/25, 1/20, 1/15, 1/10, 1/5,
  { discrete: width = 640, height = 480 }
          Time interval between frame: 1/30, 1/25, 1/20, 1/15, 1/10, 1/5,
  { discrete: width = 800, height = 600 }
          Time interval between frame: 1/30, 1/25, 1/20, 1/15, 1/10, 1/5,
  { discrete: width = 960, height = 720 }
          Time interval between frame: 1/15, 1/10, 1/5,
  { pixelformat = 'YUYV', description = 'YUV 4:2:2 (YUYV)' }
  { discrete: width = 160, height = 120 }
          Time interval between frame: 1/30, 1/25, 1/20, 1/15, 1/10, 1/5,
  { discrete: width = 176, height = 144 }
          Time interval between frame: 1/30, 1/25, 1/20, 1/15, 1/10, 1/5,
  { discrete: width = 320, height = 240 }
          Time interval between frame: 1/30, 1/25, 1/20, 1/15, 1/10, 1/5,
  { discrete: width = 352, height = 288 }
          Time interval between frame: 1/30, 1/25, 1/20, 1/15, 1/10, 1/5,
  { discrete: width = 640, height = 480 }
          Time interval between frame: 1/30, 1/25, 1/20, 1/15, 1/10, 1/5,
  { discrete: width = 800, height = 600 }
          Time interval between frame: 1/25, 1/20, 1/15, 1/10, 1/5,
  { discrete: width = 960, height = 720 }
          Time interval between frame: 1/10, 1/5,
  { discrete: width = 1600, height = 1200 }
          Time interval between frame: 1/5,

1600x1200 is bigger than my screen here, so 960x720 will have to do. I had to disable SDL hardware acceleration to use resolution above 800x600, or else luvcview crashed:

  $ luvcview -w -s 960x720

The colors look good, it adapt well to light and I've had no stability issues (yet). The camera also works with ekiga (gnomemeeting):

Kopete:

And Skype (2.0 beta) (the microphone also works):