29 Dec 2010

Convert Word documents (with pictures) to Mediawiki

Update (2011-06-14)! Magnus done a cleaner 'python-only' implementation of this tool - found here: https://github.com/mhagander/word2mediawiki/

This post will explain how to automatically convert MS Word files (with images) to Mediawiki pages. Any filetype OpenOffice supports can be converted.

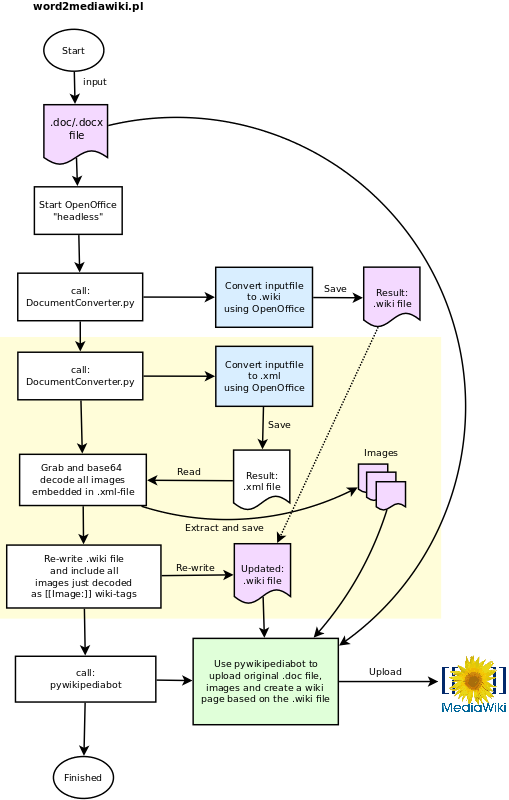
Short explanation: We use OpenOffice to convert the Word files to wiki-syntax, but some voodoo is needed to fetch and upload any images included in the Word-file (the "voodoo" is depicted yellow in the flowchart below):


More detailed explanation: The perl script word2mediawiki.pl take a Word file as input. After some rudimentary checks, it calls the python script DocumentConverter.py which calls OpenOffice to do the actual conversion. This is done twice; we convert to both .wiki and .xml files. Since the .wiki file DO NOT contain any images (it only adds empty [[Image:]] wiki-tags where the images are supposed to be), we convert to .xml that DO include images. Here the images are base64 encoded, so we parse the .xml file, fetch all base64-images, decode and save as ordinary images files. We re-write the .wiki file to update all empty [[Image:]] wiki-tags with the correct image file just decoded. Finally we upload the original Word file (for reference), all images and create a wiki-page based on the .wiki files using the pywikipediabot. Se example below.

Prerequisite and install:

A) Linux - but may work on other platforms as well (not tested)
B) Install Perl and Python
C) Install the Python-UNO bridge. This enable Python to talk to the OpenOffice API (and do the conversion)
 
  # apt-get install python-uno

D) Install OpenOffice. We run OpenOffice "headless", so X is not required.

E) Install the OpenOffice "Sun Wiki Publisher" extension. This adds support for .wiki and .xml export.

  # unopkg add sun-wiki-publisher.oxt

F) Create a word2mediawiki directory. Download the word2mediawiki.pl script, and the PyODConverter script. Note! I've modified the PyODConverter script to support .wiki and .xml. You can download the modified version below:

  $ mkdir word2mediawiki
  $ cd word2mediawiki
  $ wget http://www.larsstrand.no/code/word2mediawiki/word2mediawiki.pl

G) Install pywikipediabot:

  $ svn co http://svn.wikimedia.org/svnroot/pywikipedia/trunk/pywikipedia

H) Configure pywikipediabot. Use the testbox2_family.py file as template for your Mediawiki installation. The file should be self-explanatory:

  $ cd pywikipedia/families 

Add username and password:

  $ cd ..
  $ cat user-config.py
  # -*- coding: utf-8  -*-
  family = 'testbox2'
  mylang = 'en'
  usernames['testbox2']['en'] = u'Wiki-USERNAME'
  password_file = "user-password"
  $ cat user-password
  ("Wiki-USERNAME", "Wiki-PASSWORD")

I) Test pywikipediabot: 

  $ python ./login.py -force -all
  unicode test: triggers problem #3081100
  Logging in to testbox2:en as Wiki-USERNAME via API.
  Should be logged in now

Great! We're ready for our first test.


Convert:

We find a word-file and execute:

  $ ./word2mediawiki.pl ../Testfile.doc
  #############################
  ## Converting /export/home/lks/tmp/Testfile.doc to .wiki and .xml using soffice..
  #############################
  Converting image: ../converted/Testfile_1.jpg
  Converting image: ../converted/Testfile_2.jpg
  Rewrote wiki page with new Image tag: [[Image:Testfile_1.jpg]]
  Rewrote wiki page with new Image tag: [[Image:Testfile_2.jpg]]
  #############################
  ## Conversion complete: ../converted/Testfile.wiki
  ... >>>> Skipping a bunch of output here.

  ## Uploading the wiki page
  ## Exec: python ./pywikipediabot/pagefromfile.py -start:XZXZ42 -end:YZYZ42 -safe -file:../converted/Testfile.wiki
  Reading '../converted/Testfile.wiki'...
  >>> Testfile <<<
  Logging in to testbox2:en as Wiki-USERNAME via API.
  Should be logged in now
  Sleeping for 8.3 seconds, 2010-12-29 18:03:38
  Creating page [[Testfile]] via API
  End of file.
  ## Conversion and upload complete

Note 1: You might get a warning when the pywikipediabot tries to upload the images/.doc file or create the wiki-page. This can happen if the same image/.doc file already have been uploaded. If the a wiki-page with the same name already exists, the bot issue a warning and abort.

Note 2: When OpenOffice convert the .doc file, it might spew out a bunch of warning and/or error messages. These can be ignored. OpenOffice complains a lot. 

Note 3: If the the script exits with a complain about "Can't connect to soffice on port" - just re-run the script. OpenOffice can be a little slow to start. (It will fork into the background the first time).

Note 4: The conversion is nowhere near perfect, and you might want to look over the wiki-page to ensure correct formatting.

Note 5: The filename of the Word file is used as name of the Wikipage. Example: "Testfile.doc" result in "mediawiki/index.php/Testfile"

Example:

27 Nov 2010

Freezing cold server!

The winter has arrived early in Norway this year. Cold winds from Sibir have brought freezing temperatures all over the country. Its now approx -10C here in Oslo, and the temperatures are expected drop further next week. This is good news for my balcony server!

I use Munin to monitor the temperature sensors in the server. One of the CPU cores is showing a nice 6C. One of the disks records 5C. Hopefully the fans will start spinning again once the temperatures starts rising again in the spring...


Since I'm a little worried what will happen if the temperatures drops below 0C inside the disks, I started the folding client to generate some heat (it uses 100% CPU on all cores). The temperature immediately jumped ~5-10 degrees:


Now I'm ready for the winter!

8 Nov 2010

Great Firewall of China

I'm attending the IETF79 meeting here in Beijing. So far, it has been great. Meeting the people I've only read about, and participating in discussions. In particular, I'm looking forward to the kitten WG meeting (GSS-API authentication) and anything related to SIP, in particular sipcore.

Since this is Beijing, we're behind the Great Firewall of China, also called The Golden Shield. It works, as far as I've read, on three layers:
  1. A rudimentary "DNS block" and/or redirect.
  2. If you access the IP-address directly, it sends a TCP RST effectively tearing down your connection. (You browser responds with a "Connection reset")
  3. Content filtering of HTTP-traffic. Especially targeted at news-articles containing certain sensitive information. If a one or more pre-defined keywords appear in the page, the connection is blocked.
A lots of material have been written about the firewall. And several methods can be used to counter the firewall, like using a proxy or VPN-connection. You can also test if your site is blocked by the firewall.

A couple of DNS lookups of blocked sites from behind the firewall:

  $ cat /etc/resolv.conf
  nameserver 202.106.0.20
  nameserver 202.106.46.151

  $ dig +short www.facebook.com
  $ dig +short www.youtube.com
  youtube-ui.l.google.com.
  youtube-ui-china.l.google.com.
  66.249.89.100
  66.249.89.101
  $ dig +short www.blogspot.com
  blogger.l.google.com.
  72.14.203.191

But IETF's NOC have taken over the hotel network (both wired and wireless) and are currently bypassing the firewall. In cooperation with Tsinghua University, two 1Gbps links connect us to the CERNET (with backup to CSTNet).

A couple of test network has also been deployed. Including a IPv6-only network and a IPv6 network using NAT64.

25 Aug 2010

Bubba Two - some performance numbers

Here are my experience with the Bubba Two NAS so far. Below are some performance numbers.

Write locally:

  lks@bubba:~$ dd if=/dev/zero of=bigfile bs=1M count=1K
  1024+0 records in
  1024+0 records out
  1073741824 bytes (1.1 GB) copied, 96.8614 seconds, 11.1 MB/s

Testing raw network traffic:

  lks@bubba:~$ iperf -c 192.168.1.10
  ------------------------------------------------------------
  Client connecting to 192.168.1.10, TCP port 5001
  TCP window size: 16.0 KByte (default)
  ------------------------------------------------------------
  [  3] local 192.168.1.3 port 54697 connected with 192.168.1.10 port 5001
  [  3]  0.0-10.0 sec  76.4 MBytes  64.1 Mbits/sec

Write over NFS (exported with UDP):

  root@titan:/mnt/lks# dd if=/dev/zero of=bigfile bs=1M count=1K
  1024+0 records in
  1024+0 records out
  1073741824 bytes (1.1 GB) copied, 174.882 s, 6.1 MB/s

During the test, the CPU clocks in at about 70%. Since the disk can deliver almost the double of that, I guess the bottleneck is the bus.

Downloading over ftp give around 7-8MB/s (~55-65Mbits/s). Samba around 5-6MB/s (~40-48Mbit/s).

These numbers are more than adequate for most of my multimedia needs. A 720p HD film encoded in MPEG2 needs around 20Mbits/s (~2.4MB/s). But since most films are encoded using MPEG4 (or similar) - a proper encoded 1080p movie will only require around 2-3MB/s.

23 Aug 2010

The Bubba Two NAS

My balcony server finally died on my the other day. It has been running 24/7 for four years in all kinds of weather. I wasn't very surprised - in fact I've been waiting for it to happen. The motherboard had died. I've replaced the motherboard, and its back up. But for how long before a disk or something else fails?

I have backup of (mostly) everything here and there, but I would like to have everything on a separate NAS box. One of the most exciting NAS boxes on the market right now is something called Bubba|Two.

Bubba Two is produced by the Swedish company Excito. Its basically a small Linux server with a big disk. You can use the slick web-interface, or you can ssh into the NAS and treat it like an ordinary Linux-server. It is a LAMP server with SSH running Debian Etch. Samba, proftpd and Mediatomb (upnp) provide the box with file-server capabilities. It even have Squeezecenter installed if you have a Squeezebox (which I happen to have).

Its a ARM processor clocked at 333MHz with 256MB RAM and a 2TB disk. It uses ridiculous low amount of power (max 12W). There is no fan, so the only noise is from the HDD itself - which is barely audible.

Since the default apt-repositories are no longer working (Etch is too old), I change sources.list to:

  deb http://archive.debian.org/debian/ etch main

I can now proceed to install NFS-server, Munin-node and Bind. A couple of minutes later, and its all running smoothly. Too easy.

6 Jun 2010

A professional looking resume made in Latex

Some time ago, I needed an updated resume (and no, I could not "just send a Linkedin link"). I started editing it in OpenOffice, and was (again) struck by how terrible it is to edit, format and align a nice layout. I wanted to use something else - something like Latex.

I've been trying out some Latex resume templates, but none have been good enough (they often have terribly layout). I stumbled across the resume to Martin Michlmayr, and immediately spotted that it was created using Latex. It was nice, clean and looked professional - just what I was looking for. One email later, and he sent me the template he used. He has used and modified res, originally developed by someone else (Michael DeCorte in 1988 according to the header).

If you're interested, you can find the files here:
The only thing missing now is to include a profile picture. I tried a quick and simple includegraphics, but the picture did not float where I wanted, so I have to look into this later.

Update: I also need to check out the ModernCV Latex template: http://www.ctan.org/tex-archive/macros/latex/contrib/moderncv/

Update: I've added support for a profile picture (April 2011).

19 Apr 2010

How to make wine

My soon-to-be-wife and I are brewing delicious fortified wine. We do everything ourselves; we pick various berries, prepare and tap on bottles. This weekend we held a wine-tasting party, and I held a presentation of the whole wine-making-process.

Read more here (8.4MB, Norwegian): http://larsstrand.no/writings/pres/201004-Vin/Hjemmelaget-vin-2010.pdf

6 Jan 2010

Network Weathermap

In my last post I used MRTG to monitor the network equipment. MRTG works great with SNMP, but it only present a graph per network port of the switch/router. So, unless you are the network guy, these graphs do not make much sense.

It would be nice to plug in the data from MRTG into a Network Weathermap of some sort. After searching around and trying different weathermaps, the choice fell on "PHP Network Weathermap". It is actively developed, has good documentation and works great for small/medium-sized networks (the map is hand crafted).

The weathermap can use sources from RRDtool which is the backend used by software like Munin, Cacti and MRTG (if enabled) or from the "original" MRTG (comments on the html-pages generated by MRTG). I'll be using the latter datasource - but I'll be sure to try this weathermap with Munin 1.4 another time.

The configuration for each "map" you create is a text-file. This text file can be created using a (simple) editor or manually hand-crafted. Once you know the (simple) syntax and have an overview of the network, a map is easy to create.

Let's go:

1. First you need MRTG up and running

See my previous blog post.

2. Download and install

  1. Download the latest from here: http://www.network-weathermap.com/download
  2. Unpack under /var/www/html/weathermap
  3. Read the manual if you need additional assistance.

3. Create a new map

The weathermap comes with a (rudimentary) map editor, but I found it much easier to edit the configuration file myself while I consult the reference manual.
The config file for each map consist of three main parts:
  1. Global section
  2. Node section and
  3. Link section (between the nodes)
3.1 Create a global section

In the global section we define the size of the map, title, and so forth. I also define some additional fonts and template for NODE and LINKS.

#
# PHP Weathermap config
#
# Map: Company Name Core Network
#
#

# The size of the map and title
WIDTH 1100
HEIGHT 740
HTMLSTYLE overlib

TITLE Company Name - Core Network Weathermap
TITLEPOS 10 20
TITLEFONT 14

# The output of the map
HTMLOUTPUTFILE company-core-network.html
IMAGEOUTPUTFILE company-core-network.png

# Information about of the newest and oldest data used from MRTG (freshness of the data)
TIMEPOS 10 690 Created: %d %b %Y %H:%M:%S
MAXTIMEPOS 10 710 Newest data: %d %b %Y %H:%M:%S
MINTIMEPOS 10 730 Oldest data: %d %b %Y %H:%M:%S

# We define some additional fonts
FONTDEFINE  8 /var/www/html/weathermap/docs/example/Vera.ttf 8
FONTDEFINE  9 /var/www/html/weathermap/docs/example/VeraBd.ttf 8
FONTDEFINE 10 /var/www/html/weathermap/docs/example/VeraBd.ttf 10
FONTDEFINE 12 /var/www/html/weathermap/docs/example/Vera.ttf 12
FONTDEFINE 14 /var/www/html/weathermap/docs/example/VeraBd.ttf 14

# Here we define the legend
KEYPOS DEFAULT 300 670 Traffic Load
KEYTEXTCOLOR 0 0 0
KEYOUTLINECOLOR 0 0 0
KEYBGCOLOR 255 255 255
KEYFONT 8
KEYSTYLE horizontal

BGCOLOR 255 255 255
TITLECOLOR 0 0 0
TIMECOLOR 0 0 0
SCALE DEFAULT 0 0   192 192 192
SCALE DEFAULT 0 1   255 255 255
SCALE DEFAULT 1 10   140 0 255
SCALE DEFAULT 10 25   32 32 255
SCALE DEFAULT 25 40   0 192 255
SCALE DEFAULT 40 55   0 240 0
SCALE DEFAULT 55 70   240 240 0
SCALE DEFAULT 70 85   255 192 0
SCALE DEFAULT 85 100   255 0 0

SET key_hidezero_DEFAULT 1


# TEMPLATE-only NODEs:
NODE DEFAULT
        MAXVALUE 100
        LABELFONT 9
        LABELOUTLINECOLOR none

# TEMPLATE-only LINKs:
LINK DEFAULT
        BANDWIDTH 1G
        #Use "BWLABEL percent" if you want link utilization in percent
        BWLABEL bits
        WIDTH 3
        BWSTYLE angled
        BWFONT 8
        # NOTE! The next three lines should be on *one* line
        NOTES Current bandwidth utilization (in bits):
           IN {link:this:bandwidth_in:%0.2k} of {link:this:max_bandwidth_in:%0.2k} ({link:this:inpercent:%0.2f}%)
          OUT {link:this:bandwidth_out:%0.2k} of {link:this:max_bandwidth_out:%0.2k} ({link:this:outpercent:%0.2f}%)
        # MRTG graph specific sizes
        OVERLIBWIDTH 500
        OVERLIBHEIGHT 135
        # Arrow comments
        COMMENTFONT 8
        COMMENTSTYLE edge
        COMMENTPOS 50 50

# End of global section

3.2 Next, we define some nodes (switches, routers, servers, ..)

We're plotting both the placement, label, icon and - if any - a "info-link" on each node. The "info-link" is:
  • a link to the MRTG page of the network switch/router, or if its a server,
  • a link to the munin page for that sever.
# regular NODEs:
NODE Internet
        LABEL Internet
        LABELFONT 12
        ICON images/Cisco-network.png
        POSITION 400 100
        NOTES Internet connection - ISP-name
        LABELOUTLINECOLOR none
        LABELBGCOLOR 255 233 170

NODE 10.1.1.1.
        LABEL 10.1.1.1 [1]
        LABELOFFSET S
        INFOURL http://mrtg/10.1.1.1.html
        ICON images/Cisco-Catalyst-access-gw.png
        POSITION 400 400
        NOTES Cisco 6500 [1] - Core Switch

# Additional nodes goes here..
...

3.3 Once all the nodes are defined, we add links between them.

Each link fetches its network utilization from MRTG. So we only need to point each link to the corresponding link in MRTG.

# Internet
LINK 10.1.1.1-Internet
        NODES 10.1.1.1 Internet
        OVERLIBGRAPH mrtg/10.1.1.1/10.1.1.1_241-day.png
 # This gives a nice "mouse-over" graph
        INFOURL http://mrtg/10.1.1.1/10.1.1.1_241.html
 # .. or add the Munin page
        TARGET /var/www/html/mrtg/10.1.1.1/10.1.1.1_241.html
        BANDWIDTH 10G

# Additional links go here..
...

4. We run weathermap to generate the map

  $ cd /var/www/html/weathermap
  $ /weathermap --config configs/company-core-network.conf

You can now point your web browser to the newly created html-file (defined in the global section).

5. The last thing we'll do it to up a cron-job so that the map is updated every five minutes

We let it run one minute after MRTG, so that we get most fresh data:

  1-59/5 * * * * weather /var/www/html/weathermap/weathercron.sh

This script just execute the same commands as in 4).

6. Hints and some nice features

  1. If you do a mouse-over on each link, you'll get the day graph from MRTG in a popup.
  2. If you click on a node, you get either the MRTG page or Munin page for that node.
  3. You get a timestamp for both the oldest and newest data used on the map
  4. If you want additional icons, you can get them from Dia. Dia has a lot of really nice network (Cisco) icons and can export to a large number of formats.


 Examples (with "SET screenshot_mode 1"):